
Tutorials, Demonstrations and Workshops
Watercolour on Ivorine.
An excellent tutorial on painting with watercolours on Ivorine by Madeleine Szymanski
Miniature Oil Painting on Ivorine.
A fascinating tutorial on painting with oil paints on Ivorine by Eleanor Torr
The Imaginative Blot.
This is a wonderful workshop provided by Eleanor Torr on using Derivan’s Liquid Pencil to create amazing miniatures.
————————————————————————–
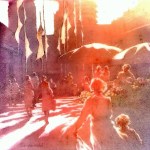
Watercolour on Ivorine – Madeleine Szymanski
Painting miniatures on ivorine can be very rewarding – the translucent surface provides a glow that is hard to achieve any other way. It is possible to work on ivorine with almost any medium, but to my mind, watercolour is a natural partner because of its transparency. There is plenty of scope for joys and frustrations with the natural inclination of watercolour to do its own thing and the added excitement of knowing that you can so easily remove paint with a damp brush (or errant finger!)
The traditional method of using watercolour on ivorine is to mark out the design with a few pale washes, then to build tone and colour gradually with fine stippling strokes. I generally use a modification of this method – starting with an overall blended wash, then subtracting as well as adding paint to reach the final image. It’s always better to paint in thin layers.
Before starting to paint it’s important to make sure that the surface of the ivorine is grease-free. I do this by scrubbing the damp surface with a little dishwashing detergent on an old paint brush, then washing off under the tap. Because of the translucency of the surface, it’s quite easy to trace through a drawing placed underneath – it’s best to draw with a fine brush or to use an aquarelle pencil, (ordinary graphite pencil is slightly greasy and repels the paint). Even when there are washes on it, you can still see the drawing underneath if you put it on a light-box. This is what I do after the initial overall wash has dried, and also to help me put colours in more or less the right place when I’m first floating the wash on. I really enjoy the excitement and immediacy of this stage because everything that follows proceeds at a snail’s pace as I try to try to adapt the drawing to fit whatever has happened with the blended colours. All too often I realise that it’s a losing battle, so it gets washed off and I start again. At least this is easy with ivorine.
There are a few practical tips to keep in mind.
Leave a border around the painted area to make handling and framing easier. Keep a piece of tracing paper or similar under your painting hand to protect the surface, and always cover the work in progress when you leave it to dry, to avoid dust. A small clear plastic box works well. It’s also a good idea to cover your palette and water container for the same reason. If you notice a greasy area which resists paint while you are working, try brushing a small amount of talcum powder over it (when it’s dry!) Use an old clean handkerchief (or similar) to dry your brush and wipe off excess paint. Tissues will leave little fibres that contaminate the washes.
The finished painting should be mounted on acid-free paper before being framed, and handled carefully during the framing process. Moisture is the main danger – the painted surface seems fairly durable otherwise. I found this out the hard way when I realised (in the middle of the night) that I had left a folder with two unframed miniatures on the roof of the car when leaving the framer that afternoon. Of course it rained all night, and by the time I found the folder in the car-park it had been run over a few times and I expected the worst. The cardboard folder was falling apart, but luckily the miniatures themselves had been in individual plastic bags, and apart from one small corner where the damp had penetrated, they were undamaged – the plastic bags had tyre marks and gravel rash all over them, but somehow the paintings survived!

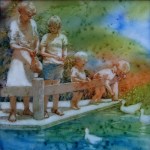
Miniature Oil Painting on Ivorine – Eleanor Torr
Ivorine is a wonderful surface, durable, smooth and with a translucency which gives the effect of light behind the support. Oil paints seem to cling while allowing the light to glow through.
Preparation of the ivorine is a good wash with detergent – no need to worry about oily fingermarks showing up later as with watercolour. I try to choose the smoothest transparent oil paints, and as close to primary colours as possible. I transfer my image with oil free carbon paper, and lift out all but the barest touch of an outline with a kneadable rubber, and then start off with light washes of clear colour, very loosely, one at a time. After each wash I wipe off all but the stain of the colour, so that the surface still throws light through from the back of the ivorine. The support is the lightest light, although occasionally I have used a dot of Titanium White to catch sunlight through glass.
The rest is simply layers of colour – it can be irritating to have to wait up to three days for the area you are working on to dry before adding another colour, but if you add on too quickly the paint can shift, and can also become mud. Then it’s time to start again, which I do – often – don’t ask why, I make some awful messes! When I do I simply wash off the surface with Citroclean – bought at any supermarket, and used instead of turpentine. Then a good scrub with a little Gumption on a sponge freshens up the surface and takes off any lingering stains – and off I go again.
I use synthetic watercolour brushes and the occasional acrylic brush. My pattern is to use my best brushes for watercolour, when they get tired they become gouache brushes, then get a good scrub in soap and detergent, after which they become oil brushes which are cleaned in Citroclean after use each day, followed by a warm water wash and scrub on a block of soap.
I use a range of other tools in my effort to get the cleanest, smoothest line, which includes sharpened toothpicks to wipe up to a line, and a scalpel to shave off dried on paint when I change my mind. I also wrap an old cotton rag around a point and use it to stroke off a highlight. I try hard to keep my layers of colour as thin as possible, and blend edges with a soft dry brush.


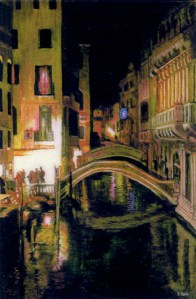
The Imaginative Blot – Eleanor Torr
This is a process I first learned from Patricia Moy when studying Miniature Painting in her classes. In her process fresh watercolour tube paint was used. However, when I was trying to come up with an imaginative drawing process for the Founders Award at last year’s National Awards Exhibition, I came across Derivan’s Liquid Pencil – and had a play.
Materials
Jar Derivan Liquid Pencil, any colour, MUST BE “Rewettable” (with white cap)
Watercolour paper (I use Arches 300 gm Hot Pressed, it must be smooth)
Water
2 Brushes (Large watercolour )
2 Water pots (1 large, 1 any size)
Cling wrap (you need large quantities, so either a cheap brand or something similar)
Something heavy such as a large book, or a brick or half brick.
- Have everything around you and ready to access easily. Stir the liquid pencil until it becomes liquid in texture. (Fig. 1)
- lay out a sheet of paper, you will need it to be a minimum of 15 cm square.
- With one of the brushes transfer enough water from your CLEAN water pot to make a pool of water on your sheet of paper, size is up to you, remembering that the final product should remain within miniature guidelines. The water should stand proud from the paper in a rounded bubble, and this is where you can manipulate the shape to anything you desire. If the height of the water subsides with the manipulation, add more water. (Fig. 2)
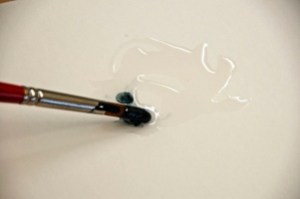
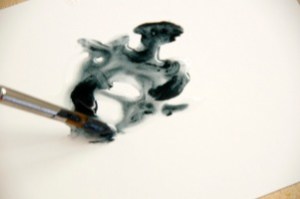
- Now, with the other brush, which has been dunked in the water, pick up a good blob of liquid pencil and gently introduce it into the blot of water. The liquid pencil should immediately start moving over the surface of the water. (Fig. 3)
- Continue to add streaks, blots and dabs of liquid pencil until you are satisfied with the result. The paper should not be moved at all, and remember not to add too much liquid paper or the result will be more sculptural and images will be harder to find. Return the brush to the other large water jar and clean it. (Fig. 4)
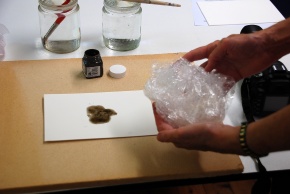
- Pull out about two to three metres of clingwrap, and crumple it up in your hands, the more wrinkles, the more shapes and images. (Fig. 5)
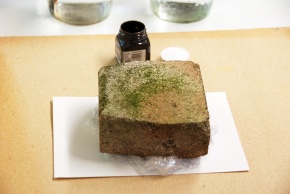
- Carefully place the clingwrap onto the blot, press down, and immediately put whatever you have chosen as a weight down and press again. Leave the weight on the blot and walk away. (Or start on another blot – not every one has images you can use.) (Fig. 6)
- Now we come to the hardest part. Don’t touch the blot for 24 hours. I have been told that 2 hours is long enough for watercolour, but once the clingwrap is moved, if the image is still damp, the sharp images merge and you lose your definition.
- In 24 hours remove the weight and the clingwrap. You can keep the clingwrap for another time should you find this an interesting way to work. In the interests of keeping my miniature in “Drawing” mode, I worked with watercolour inks to fill in and round out the images I found, but I much prefer to work with watercolour and white (gouache), limiting the amount of white to allow as much of the image to show through as possible. (Fig. 7)
- If you have put in too much liquid pencil and the blot is too embossed looking to work on, it is possible to scrape off unwanted liquid paper with a scalpel. The “rewettable” nature of the liquid pencil allows you to wash out areas of you wish (the paper remains somewhat stained however).
This is simply a process I have discovered, and it might be fun for you to try, it frees the mindset and allows you to stretch your imagination when everything feels just a little dull.


Home About Miniatures Gallery Exhibitions Links Contacts Forms
